We'll be setting up a fresh Blender Add-on project with PyCharm that works with source control. This guide was written for Blender 2.80 but it works the same in later versions as of May 2024.
I have made a boilerplate template for Blender 4.x, 3.x that you can copy and use as a base. https://github.com/saaratrix/empty-blender-add-on-template .
Setting up a new project
First, create a Pure Python project in PyCharm in a source control repository.
If you are new to PyCharm, do the following:
File -> New Project -> Pure Python
and then select the location.

Then, create a new folder inside the project which is the Blender Add-on package that will eventually be run by Blender. This is the folder where all your files for the add-on will go.
Then add an __init__.py file inside the add-on folder. This file is the entry point of your add-on. The initial code in the file can look something like this:
    import bpy


    bl_info = {
        "name": "Example Add-on",
        "author": "Luna",
        "version": (0, 0, 1),
        "blender": (2, 80, 0),
        "category": "Generic",
        "location": "View3D",
    }

    # Add your Blender classes here after importing them
    classes = ()
    register, unregister = bpy.utils.register_classes_factory(classes)

    # This allows you to run the script directly from Blender's Text editor
    # to test the add-on without having to install it.
    if __name__ == "__main__":
        register()
Symlinking folder to Blender
Blender wants the add-on folder to be inside the Blender Add-on folder, which on my computer is located at
C:\Program Files\Blender Foundation\Blender\2.80\scripts\addons.
To create a symlink on Windows 10, we need to use command prompt run as administrator.
Then run the following syntax replacing Target and Source with your folder paths:
mklink /D "Target" "Source".
For my project I used this command:
mklink /D "C:\Program Files\Blender Foundation\Blender\2.80\scripts\addons\example-addon" "C:\Users\User\example-project\example-addon"
Activating the add-on and confirming the symlink works
If everything went well with the symlink, you should now have a folder inside your Blender Add-on folder (C:\Program Files\Blender Foundation\Blender\2.80\scripts\addons).
To confirm that it works you should now be able to see the add-on inside Blender.
Edit -> Preferences... -> Add-ons -> Search for your add-on

Getting code completion for the bpy module
The Blender API is on the module bpy, which is why we need to do import bpy inside __init__.py.
But to get code completion for the Blender API we need to add the typings for the bpy module.
This can be done by either adding already existing typings, or generate them from Blender.
I failed to generate them from Blender myself so I downloaded them.
I chose fake-bpy module that can be found at https://github.com/nutti/fake-bpy-module.
There are two ways to install fake-bpy-module.
One way is to use pip and add the fake-bpy-module-2.80 package.
If you're on a different version than Blender 2.80 then pick that version.

The other way is to download the package yourself and place it inside your project.
The packages can be downloaded here: https://github.com/nutti/fake-bpy-module/releases
I placed the files inside a fake-bpy-module folder, and then marked the directory as a source root.

You're finished!
These should be all the steps to set up your very first Blender Add-on project.
Now you can add things like operators, panels, etc., so you can actually do or see something in Blender!
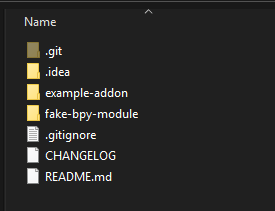
My project folder looked like this when finished:

To continue your first Blender add-on, here is a link to the official tutorial: https://docs.blender.org/manual/en/latest/advanced/scripting/addon_tutorial.html
More reading
Other Blender Add-on related blog posts by me that may be of interest:
No comments:
Post a Comment